Vagrant 是一个单机版的虚机管理系统,和 OpenStack 类似,但远远比 OpenStack 轻量级,当然提供的功能也要少很多,因为它的定位非常简单:Vagrant enables users to create and configure lightweight, reproducible, and portable development environments。说简单点就是可以通过命令行基于基础镜像非常容易的定义、构建以及销毁虚机。
Vagrant 是一个跨平台软件,支持 Linux/Windows/Mac 三大平台,在 Docker 火起来之前,github 上的开源项目多会提供 Vagrantfile 供用户搭建测试环境,在该文件里可以通过 ruby 脚本定义虚机参数,通过 ansible/salt 或者简单的 shell 脚本初始化虚机,当然随着 Docker 的普及,很多项目逐渐有用 Dockerfile 替代 Vagrantfile 的趋势。
虽然 Docker 很火,但仍然有它不适用的地方,OpenStack 虽然很强,但太复杂,很多时候我们的需求非常简单,几台可以快速创建、销毁的虚机,仅此而已,此时 Vagrant 完全可以满足需求。
制作镜像
与 docker pull 类似,vagrant box add 可以从网上拉取镜像(镜像在这里只是一个通用的名词而已,类似于基础系统模板等,并不真是 OpenStack Glance 这种镜像),当然由于虚机的镜像通常很大,因此我们一般都是在本地通过 VirtualBox 手工创建虚机(有 veewee[1] 这样的工具实现虚机创建的自动化),然后基于这个虚机创建一个通用的镜像,也有标准的 Packer[2] 工具制作镜像(不止是支持 Vagrant 也支持 OpenStack 等各种常见的镜像格式)。这里我们以在 Ubuntu 16.04 机器上手工创建一个 CentOS 7.3 系统的基础镜像为例,介绍基础镜像的制作过程。
- 当然第一步是安装 VirtualBox 和 vagrant(注意不要使用系统自带的 apt 源中的 virtualbox,会导致主机挂死),可以直接去 VirtualBox 官网下载 deb 安装包,也可以使用官方的 apt 源:
$ wget -q https://www.virtualbox.org/download/oracle_vbox_2016.asc -O- | sudo apt-key add -
$ sudo vi /etc/apt/source.list
deb https://download.virtualbox.org/virtualbox/debian xenial contrib
$ sudo apt update && sudo apt install virtualbox-5.2 dkms
去 Vagrant 官网下载 deb 安装包并安装:
$ sudo gdebi vagrant_2.0.2_x86_64.deb
Reading package lists... Done
Building dependency tree
Reading state information... Done
Reading state information... Done

no description given
Do you want to install the software package? [y/N]:
本文以 VirtualBox 5.2 和 Vagrant 2.0 版本为例。
如果安装 VirtualBox 时报内核模块的错(此时虽然可以打开 VirtualBox 界面创建虚机,但运行虚机同样会报错),建议更新系统并重启,然后执行如下命令重新编译 VirtualBox 内核模块:
$ sudo /sbin/rcvboxdrv setup
也可以使用下面的命令实现:
$ sudo /sbin/vboxconfig
- 打开 VirtualBox 图形界面,用以往所熟悉的方式安装 CentOS 7.3 系统,在虚机硬件配置时可以去掉 Audio, USB 的支持(而且如果不去掉的话,可能会报如下错误,虽然可以给 vagrant 所在机器的 VirtualBox 安装扩展模块解决,但毕竟比较麻烦),通常来说我们都用不到这些功能;
Stderr: VBoxManage: error: Implementation of the USB 2.0 controller not found!
VBoxManage: error: Because the USB 2.0 controller state is part of the saved VM state, the VM cannot be started. To fix this problem, either install the 'Oracle VM VirtualBox Extension Pack' or disable USB 2.0 support in the VM settings.
VBoxManage: error: Note! This error could also mean that an incompatible version of the 'Oracle VM VirtualBox Extension Pack' is installed (VERR_NOT_FOUND)
VBoxManage: error: Details: code NS_ERROR_FAILURE (0x80004005), component ConsoleWrap, interface IConsole
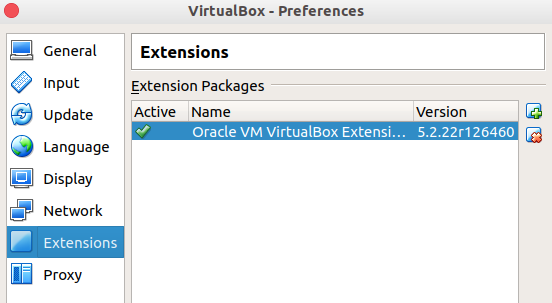
扩展模块可以通过命令行安装:
$ sudo VBoxManage extpack install Oracle_VM_VirtualBox_Extension_Pack-5.2.22.vbox-extpack
VirtualBox Extension Pack Personal Use and Evaluation License (PUEL)
...

0%...10%...20%...30%...40%...50%...60%...70%...80%...90%...100%
Successfully installed "Oracle VM VirtualBox Extension Pack".
也可以通过图形界面安装:
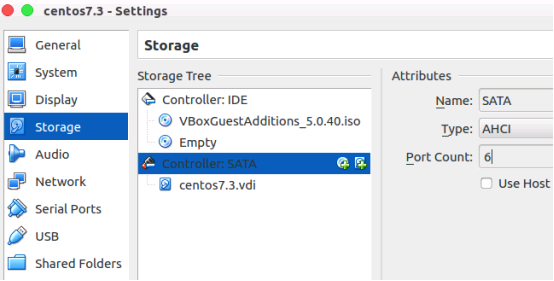
- 修改存储控制器的 Port Count,以便在后面定义虚机时使用该控制器可以挂载多块硬盘(但最近发现好像又不需要了,比较奇怪):
- CentOS 安装之后网口默认不会启用,需要修改网口配置文件,将其中的 ONBOOT 选项改成 yes 并重启系统生效,否则后面通过 vagrant 创建的虚机无法正常登录,当然也无法通过 yum 进行软件的安装:
$ sudo vi /etc/sysconfig/network-scripts/ifcfg-enpxxx
ONBOOT=yes
- 然后进入虚机配置源(使用官方的 Everything DVD 作为源,这样才不会将现有的系统升级,特别是一旦使用网络上的源会要求内核升级才能编译安装下一步骤中的 Guest Additions),安装 bzip2、kernel-devel 以及 gcc:
$ sudo yum install bzip2 kernel-devel gcc perl make
- 在 VirtualBox 的 Devices 菜单中的选择 Insert Guest Additions CD Image(如果提示找不到该 CD 则会自动去网络上下载,如果因为网络原因,可以自己按照提示用下载工具等下载,然后放入 ~/.config/VirtualBox/ 目录中),然后去虚机中 mount 该 CD 并安装 Guest Additions:
$ sudo mount /dev/sr0 /media
$ cd /media
$ sudo ./VBoxLinuxAdditions.run
-
系统安装完可以做一些自己想要的优化,最好可以为普通用户增加无需密码的 sudo 权限,这样后面以普通用户执行需要管理员权限的命令时会比较方便(当然后面也可以以 root 用户登录,但如果是 Ubuntu 虚机要考虑到 Ubuntu 是禁止 root 用户登录的);
-
关闭刚才创建的虚机;
-
查看刚才创建的虚机:
$ VBoxManage list vms
"centos7.3" {23b8aa39-acb7-4f19-88a5-f7a2dd973a56}
- 根据查询出来的虚机名字制作 Vagrant 镜像:
$ vagrant package --base centos7.3 --output centos7.3.box
==> centos7.3: Exporting VM...
==> centos7.3: Compressing package to: /home/runsisi/centos7.3.box
这里 --base 参数指定的是刚才查询出来的虚机名称,如果虚机名称中有空格则需要使用双引号括起来,--output 参数指定的是输出的镜像文件名字,可以加上路径,没路径的话就输出在当前路径下;
- 注册刚才生成的镜像,这样后续定义虚机时才能引用到上一步制作的镜像:
$ vagrant box add centos7.3 ./centos7.3.box
==> box: Box file was not detected as metadata. Adding it directly...
==> box: Adding box 'centos7.3' (v0) for provider:
    box: Unpacking necessary files from: file:///home/runsisi/centos7.3.box
==> box: Successfully added box 'centos7.3' (v0) for 'virtualbox'!
其中 add 子命令第一个参数指定的是镜像名字(当同时还指定 –name 参数时,–name 被忽略),可以随意定义,后续在定义虚机时会需要用到,此时可以删掉刚才生成的 centos7.3.box 文件,因为 vagrant box add 会拷贝一份到 Vagrant 自己的私有目录下(镜像库)。
注:这个镜像文件可以拷贝到其它机器上,并使用 vagrant box add 命令注册到该机器的 Vagrant 镜像库中。
至此虚机镜像制作完成,且已注册到 Vagrant 的镜像库中,可以通过如下命令查看当前机器所有已注册的镜像:
$ vagrant box list
centos7.3 (virtualbox, 0)
也可以通过如下命令删除已注册的镜像:
$ vagrant box remove centos7.3
Removing box 'centos7.3' (v0) with provider 'virtualbox'...
[1] https://github.com/jedi4ever/veewee
[2] https://github.com/hashicorp/packer
定义虚机
刚才我们注册了一个名字为 centos7.3 的镜像,我们可以以该镜像为基础定义虚机:
$ vagrant init centos7.3
A `Vagrantfile` has been placed in this directory. You are now
ready to `vagrant up` your first virtual environment! Please read
the comments in the Vagrantfile as well as documentation on
`vagrantup.com` for more information on using Vagrant.
在当前目录下生成的 Vagrantfile 是一个 ruby 格式的虚机定义文件,可以修改该文件实现虚机(或多个虚机)的完全自定义。下面贴一个创建四个虚机的例子,更多的配置细节可以参考官方文档[1](不用太在意里面的细节,一般情况下照抄并根据自己的需求进行调整就行,比如磁盘的定义我也是以前自己参考 VBoxManage 的帮助文档摸索出来的,官方文档并没有):
# -*- mode: ruby -*-
# vi: set ft=ruby :

Vagrant.configure(2) do |config|
  config.vm.box = "centos7.3"

  config.ssh.username = "runsisi"
  config.ssh.password = "123456"

  config.vm.provider "virtualbox" do |vb|
    vb.gui = false
    vb.cpus = 2
    vb.memory = "1024"
  end

  # define a single virtual machine
  config.vm.define "m" do |m|
    m.vm.hostname = "ceph"
    m.vm.network :private_network, ip: "192.168.32.2"
    m.vm.network :public_network, ip: "192.168.33.2", bridge: "enp2s0"
    # define one additional disk
    m.vm.provider "virtualbox" do |vb|
      dn = "disk0"
      df = "#{dn}.vdi"
      if ! File.file?(df)
        vb.customize [ "createmedium", "--filename", dn, "--size", "512000" ]
      end
      vb.customize [ "storageattach", :id, "--storagectl", "SATA", "--port", 1, "--device", 0, "--type", "hdd", "--medium", "#{df}" ]
    end
  end

  # define multiple virtual machines
  (0..2).each do |i|
    config.vm.define "m#{i}" do |m|
      m.vm.hostname = "ceph#{j}"
      m.vm.network :private_network, ip: "192.168.32.1#{i}"
      m.vm.network :public_network, ip: "192.168.33.1#{i}", bridge: "enp2s0"
      # define multiple additional disks
      (0..1).each do |d|
        m.vm.provider "virtualbox" do |vb|
          dn = "disk-#{i}-#{d}"
          df = "#{dn}.vdi"
          if ! File.file?(df)
            vb.customize [ "createmedium", "--filename", dn, "--size", "512000" ]
          end
          vb.customize [ "storageattach", :id, "--storagectl", "SATA", "--port", 1+d, "--device", 0, "--type", "hdd", "--medium", "#{df}" ]
        end
      end
    end
  end

  config.vm.provision "shell", inline: <<-SHELL
    echo "provision vm!!!"
  SHELL
end
其中的 public 网络为桥接网络,其中桥接口的名字 enp2s0 可以通过 VBoxManage 查到,private 网络为单台宿主机内部互通的网络(也就是虚机之间的通信不能跨宿主机,可以参考 Vagrant 的官方文档):
$ VBoxManage list bridgedifs
Name:            enp2s0
GUID:            32706e65-3073-4000-8000-dc4a3e492ce7
DHCP:            Disabled
IPAddress:       10.120.130.140
NetworkMask:     255.255.255.0
IPV6Address:     fe80:0000:0000:0000:fc73:2001:0373:bd3a
IPV6NetworkMaskPrefixLength: 64
HardwareAddress: dc:4a:3e:49:2c:e7
MediumType:      Ethernet
Status:          Up
VBoxNetworkName: HostInterfaceNetworking-enp2s0
其中虚机已有的硬盘控制器信息可以通过如下命令查看(也可以直接在 VirtualBox 的虚机配置界面查看):
$ VBoxManage showvminfo centos7.3
Storage Controller Name (0):            IDE
Storage Controller Name (1):            SATA
[1] https://www.vagrantup.com/docs/
CentOS 官方镜像
CentOS 官方也为 Vagrant 提供了官方镜像,访问如下的链接即可进行下载:
http://cloud.centos.org/centos/
官方镜像使用用户名 vagrant 进行登录(使用公钥,无需密码),具有 sudo 权限。
官方镜像的存储控制器信息如下:
Storage Controller Name (0):            IDE
Storage Controller Type (0):            PIIX4
Storage Controller Instance Number (0): 0
Storage Controller Max Port Count (0):  2
Storage Controller Port Count (0):      2
Storage Controller Bootable (0):        on
如需增加硬盘,需要自己增加新的控制器,但是需要注意的是,由于 Vagrant customize 并不实际执行 VBoxManage 命令,而是解析 Vagrantfile 之后得到需要执行的 VBoxManage 命令然后通过事件队列顺序执行,因此除非修改 vagrant 源代码实现,否则在 Vagrantfile 中没法直接使用 customize 进行逻辑控制。
由于每个虚机控制器只能添加一次,因此为了添加控制器比较好的规避方法是,先直接创建虚机,然后关闭虚机(开机状态无法操作),并通过 VBoxManage 命令手工添加控制器:
$ VBoxManage list vms
"81_m1_1592466702110_90104" {23430d3d-a3b6-41be-9519-8976d37c4fec}
$ VBoxManage storagectl 81_m1_1592466702110_90104 --name abc --add sata --controller IntelAhci --portcount 16
$ vi Vagrantfile
# define multiple virtual machines
(1..3).each do |i|
  config.vm.define "m#{i}" do |m|
    m.vm.hostname = "ceph#{i}"
    m.vm.network :public_network, ip: "192.168.6.16#{i + 5}", bridge: "enp3s0f0"
    # define multiple additional disks
    (0..3).each do |d|
      m.vm.provider "virtualbox" do |vb|
        dn = "disk-#{i}-#{d}"
        df = "#{dn}.vdi"
        if ! File.file?(df)
          vb.customize [ "createmedium", "--filename", dn, "--size", "512000" ]
        end
        vb.customize [ "storageattach", :id, "--storagectl", "abc", "--port", 1+d, "--device", 0, "--type", "hdd", "--medium", "#{df}" ]
      end
    end
  end
end
下面 Vagrantfile 中的配置并不具有通用性:
vb.customize [ "storagectl", :id, "--name", "xxx", "--remove" ]
vb.customize [ "storagectl", :id, "--name", "xxx", "--add", "sata", "--controller", "IntelAhci", "--portcount", 16 ]
vb.customize [ "storageattach", :id, "--storagectl", "xxx", "--port", 1+d, "--device", 0, "--type", "hdd", "--medium", "#{df}" ]
设置虚机存储目录
默认情况,VirtualBox 把虚机存放在 ~/VirtualBox\ VMs/ 目录下,显然一旦虚机创建的比较多,用户目录的空间会不够,因此一般需要修改默认的虚机存放位置:
$ VBoxManage setproperty machinefolder /data/vm
如果在后面启动虚机时出现如下的错误:
There was an error while executing `VBoxManage`, a CLI used by Vagrant
for controlling VirtualBox. The command and stderr is shown below.

Command: ["import", "/home/runsisi/.vagrant.d/boxes/centos7.5/0/virtualbox/box.ovf", "--vsys", "0", "--vmname", "centos7.5_1563605083543_41673", "--vsys", "0", "--unit", "14", "--disk", "/data/vm/centos7.5_1563605083543_41673/box-disk002.vmdk"]

Stderr: 0%...10%...20%...30%...40%...50%...60%...70%...80%...90%...100%
Interpreting /home/runsisi/.vagrant.d/boxes/centos7.5/0/virtualbox/box.ovf...
OK.
0%...
Progress state: NS_ERROR_INVALID_ARG
VBoxManage: error: Appliance import failed
VBoxManage: error: Code NS_ERROR_INVALID_ARG (0x80070057) - Invalid argument value (extended info not available)
VBoxManage: error: Context: "RTEXITCODE handleImportAppliance(HandlerArg*)" at line 957 of file VBoxManageAppliance.cpp
有两种可能,一是 /data/vm 目录没有空间,二是 VirtualBox 没有 /data/vm 目录的写权限。
启动、停止、销毁虚机
通过如下命令可以查看当前 Vagrantfile 定义的虚机的状态:
$ vagrant status
Current machine states:

m                         not created (virtualbox)
m0                        not created (virtualbox)
m1                        not created (virtualbox)
m2                        not created (virtualbox)
不带参数的 vagrant up 可以启动所有虚机,而 vagrant up m 则可以只启动 m 这一台虚机,可以看到,这里的名字是 Vagrantfile 里 config.vm.define 语句定义的(后面的命令都以 m 这单个虚机为例)。
启动指定的虚机 m:
$ vagrant up m
Bringing machine 'm' up with 'virtualbox' provider...
==> m: Importing base box 'centos7.3'...
==> m: Matching MAC address for NAT networking...
==> m: Setting the name of the VM: runsisi_m_1516862858996_17376
==> m: Fixed port collision for 22 => 2222. Now on port 2200.
==> m: Clearing any previously set network interfaces...
登录虚机 m(当然也可以直接在宿主机中使用 ssh 命令登录):
$ vagrant ssh m
Last login: Thu Jan 25 14:55:22 2018 from 10.0.2.2
关闭虚机 m:
$ vagrant ssh m
Last login: Thu Jan 25 14:55:22 2018 from 10.0.2.2
删除虚机 m:
$ vagrant destroy m
    m: Are you sure you want to destroy the 'm' VM? [y/N] y
==> m: Forcing shutdown of VM...
==> m: Destroying VM and associated drives...
重启虚机 m:
$ vagrant reload m
停止虚机 m(当然也可以在虚机内执行 shutdown 命令进行关机):
$ vagrant halt m
查看虚机信息
$ VBoxManage list vms
"74_m1_1583377175191_19361" {114e538e-71da-461e-8458-ede0d63e1534}
"74_m2_1583377353492_68411" {10fd54b8-4365-4851-ae73-61e84885d1a7}
"74_m3_1583377520698_30238" {edea819b-4183-4370-801f-24fa66036f09}

$ VBoxManage showvminfo 74_m1_1583377175191_19361 | grep -i storage
Storage Controller Name (0):            IDE
Storage Controller Type (0):            PIIX4
Storage Controller Instance Number (0): 0
Storage Controller Max Port Count (0):  2
Storage Controller Port Count (0):      2
Storage Controller Bootable (0):        on
Storage Controller Name (1):            SATA
Storage Controller Type (1):            IntelAhci
Storage Controller Instance Number (1): 0
Storage Controller Max Port Count (1):  30
Storage Controller Port Count (1):      8
Storage Controller Bootable (1):        on

$ VBoxManage list vms -l | grep -i storage
Storage Controller Name (0):            IDE
Storage Controller Type (0):            PIIX4
Storage Controller Instance Number (0): 0
Storage Controller Max Port Count (0):  2
Storage Controller Port Count (0):      2
Storage Controller Bootable (0):        on
Storage Controller Name (1):            SATA
Storage Controller Type (1):            IntelAhci
Storage Controller Instance Number (1): 0
Storage Controller Max Port Count (1):  30
Storage Controller Port Count (1):      8
Storage Controller Bootable (1):        on
...
更新 Guest Additions
如果直接使用 CentOS 官方的 vbox 镜像,默认没有安装 Guest Additions,因此需要手工安装,此外,某些情况下可能也需要进行更新。
首先在虚机中安装构建内核模块所需的依赖:
$ vagrant ssh <vm>
$ sudo yum install bzip2 kernel kernel-devel gcc perl make elfutils-libelf-devel
$ exit
然后从 VirtualBox 官网下载 Guest Additions ISO 并进行安装(如果虚机系统较新,则 Guest Additions ISO 可能也需要较新的版本):
$ VBoxManage --version
6.0.14r133895
$ vagrant ssh <vm>
$ wget http://download.virtualbox.org/virtualbox/6.1.10/VBoxGuestAdditions_6.1.10.iso
$ sudo mount -o loop VBoxGuestAdditions_6.1.10.iso /media/
$ cd /media/
$ sudo ./VBoxLinuxAdditions.run
...
VirtualBox Guest Additions: Running kernel modules will not be replaced until
the system is restarted
$ exit
当然,如果宿主机上的 Virtualbox 与 Guest Additions 版本不匹配,可能会存在问题,vagrant 会有如下的告警:
The guest additions on this VM do not match the installed version of
VirtualBox! In most cases this is fine, but in rare cases it can
prevent things such as shared folders from working properly. If you see
shared folder errors, please make sure the guest additions within the
virtual machine match the version of VirtualBox you have installed on
your host and reload your VM.

Guest Additions Version: 6.1.10 r138449
VirtualBox Version: 6.0
然后重启虚机:
$ vagrant reload <vm>
修改网卡类型
$ VBoxManage list vms
"81_m1_1592466702110_90104" {23430d3d-a3b6-41be-9519-8976d37c4fec}
$ VBoxManage showvminfo 81_m1_1592466702110_90104
...
NIC 1:                       MAC: 525400E32777, Attachment: NAT, Cable connected: on, Trace: off (file: none), Type: 82540EM, Reported speed: 0 Mbps, Boot priority: 0, Promisc Policy: deny, Bandwidth group: none
NIC 1 Settings:  MTU: 0, Socket (send: 64, receive: 64), TCP Window (send:64, receive: 64)
NIC 1 Rule(0):   name = ssh, protocol = tcp, host ip = 127.0.0.1, host port = 2222, guest ip = , guest port = 22
NIC 2:                       MAC: 0800276D73EE, Attachment: Bridged Interface 'enp3s0f0', Cable connected: on, Trace: off (file: none), Type: 82540EM, Reported speed: 0 Mbps, Boot priority: 0, Promisc Policy: deny, Bandwidth group: none
NIC 3:                       disabled
NIC 4:                       disabled
...
$ vagrant halt <vm>
$ VBoxManage modifyvm 81_m1_1592466702110_90104 --nictype2 virtio
$ VBoxManage showvminfo 81_m1_1592466702110_90104
...
NIC 2:                       MAC: 0800276D73EE, Attachment: Bridged Interface 'enp3s0f0', Cable connected: on, Trace: off (file: none), Type: virtio, Reported speed: 0 Mbps, Boot priority: 0, Promisc Policy: deny, Bandwidth group: none
Happy Vagrant!
参考文献
Updated CentOS Vagrant Images Available (v1811.01)
https://blog.centos.org/2018/12/updated-centos-vagrant-images-available-v1811-01/
Stderr: VBoxManage: error: Could not find a controller named ‘SATA Controller’
https://github.com/kusnier/vagrant-persistent-storage/issues/33
CentOS Cloud Instance SIG: Metadata to build & release instances
https://github.com/CentOS/sig-cloud-instance-build
Bring Vagrant box setup in line with upstream recommendations
https://github.com/CentOS/sig-cloud-instance-build/pull/54
最后修改于 2019-01-12